The 503 error occurs when your website server cannot be reached – i.e., the server is unavailable. The reasons for unavailability can be a badly coded plugin or theme, a code snippet gone rogue, a glitch in the server, a DDoS attack, or quality issues with your hosting service overall.
Method 1: Deactivate plugins temporarily
Step 1: Login to Cpanel

Step 2: Go to Files > File Manager

Step 3: Click on the public_html folder on the left side of the the sidebar

Step 4: Now click on wp-content under the public_html folder

Step 5: There should be a plugins folder inside wp-content. Rename the plugins folder to any other name. This will deactivate every plugin on your wordpress site. Now go back to your site and check if the 503 Errors are still prevalent. If yes, then we can assume that one of the plugins was responsible for the 503 Error.

Step 6: Inorder to find the exact plugin that was causing this issue, we need to go through every plugin inside the plugins folder. Follow the below steps for this:
- Rename the first plugin in the plugins directory to something else
- If you stop seeing the 503 error, then this means you have found the plugin which was causing the issue
- If not, then repeat this process until you find the plugin
Method 2: Deactivate your theme temporarily
Deactivating the theme is a bit tricky because you can’t simply rename the theme folder as we did with the plugins folder. It would lead to an error of its own.
Step 1: Login to Cpanel

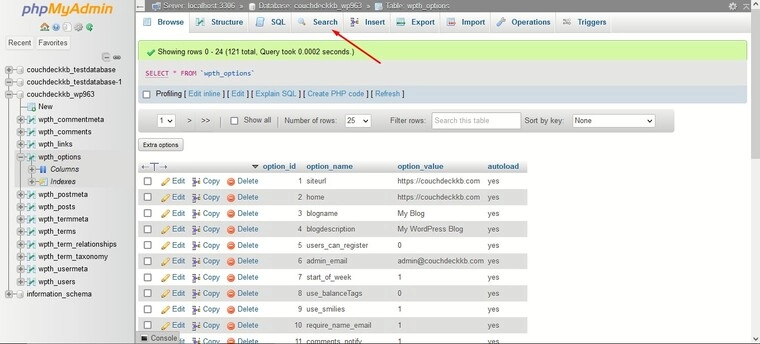
Step 2: Go to Databases> phpMyAdmin

Step 3: Now choose the database from the left sidebar and click on wpth_options


Step 4: Now click on the Search Tab on the top

Step 5: Now enter template inside the textbox for option_name

Step 6: The system will run a search and then show you your current theme under option_value. Select Edit and change the current theme to twentytwentyone.

Method 3: Disable your CDN temporarily
Occasionally, CDNs are known to cause 503 errors, so disabling it – if you have one working on your site – can be a quick solution. All CDNs have some option that allows you to pause them manually. For instance, on Cloudflare, you need to log into your account, select your website, and click on the Pause Cloudflare on site option.
Next, check your website and if the 503 error persists, then unpause the CDN and try the next solution.
Method 4: Limit WordPress Heartbeat API
The Heartbeat API is responsible for several essential functions, like auto-saving posts, showing plugin notifications, preventing you from accessing a post when someone else is modifying it, etc.
The API uses your server resources to carry out these functions. If your server can’t handle the API’s demands, it will throw a 503 error. To determine if the Heartbeat API is causing the error, you need to disable it temporarily.
Step 1: Login to Cpanel

Step 2: Go to Files > File Manager

Step 3: Now click on the public_html folder on the left hand side of the sidebar

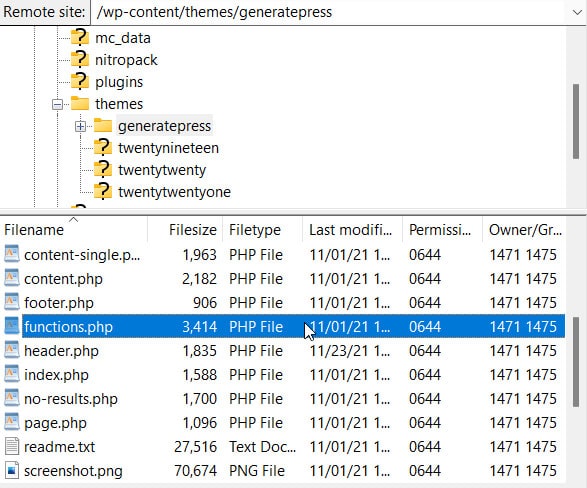
Step 4: Now locate the below folder and add the following code to it

<?phpadd_action( 'init', 'stop_heartbeat', 1 );function stop_heartbeat() {wp_deregister_script('heartbeat')}

Step 5: Save the file, reupload it, and check your website. If the error disappears, then you’ve caught the culprit.
But remember, the Heartbeat API is essential, so you can’t keep it disabled long term. You can slow down its frequency if you feel like it by installing the Heartbeat control plugin. Just make sure to delete the code snippet from the functions.php file before setting up the plugin.
Method 5: Enable WP_DEBUG
When all other solutions fail, enabling the debug mode could give you answers.
Step 1: Login to Cpanel

Step 2: Go to Files > File Manager

Step 3: Now click on the public_html folder on the left hand side of the sidebar

Step 4: Search for a file named as wp-config.php. Right click on the file and click on Edit


Step 5: Enter the below code inside the file and click on Save Changes
define( 'WP_DEBUG', true );define( 'WP_DEBUG_LOG', true );define( 'WP_DEBUG_DISPLAY', false );

If you see this popup,it means you have successfully made changes to your wp-config.php file

Now go to the wp-content directory, and you should find a debug.log file in there.
The log file contains errors that your website has been experiencing. It’ll show you the causes of the error along with specific lines of code that led to it. You are not going to find a direct indication of the 503 error, so we suggest showing the log to your hosting provider and seeking help with them.
