Twitter plays a crucial role in bringing people together on the same platform, helping to socialize with each other, and establishing a firm presence in the market. For example, you can often see many small-scale or local businesses are using different tactics to promote themselves and build a strong brand reputation.
Similarly, individual users are walking in the footsteps of influencers through a business account on Twitter. Therefore, you have to make sure that you can become successful in your plans, which is why scheduling posts is very important. Using a scheduler tool, you can set the time of posting the pictures or any other multimedia across different accounts and pages.
If you aren’t a pro or want to master the art, don’t worry because Twitter offers amazing options for scheduling. In the below discussion, we will highlight some of the ways for setting proper dates and time appropriately.
How to schedule post on Twitter?
Scheduling via Homepage
Unlike other social media platforms, you can schedule the posts on Twitter from its home page only. Therefore, you don’t have to use any third-party app.
Logging into the twitter account
Log in to your Twitter account with valid credentials.
Clicking on Tweet option
Once you have successfully logged into the concerned account, click on the “TWEET” button when a new pop-up window will appear on the home page.

Form the caption or text and add other details
You can write text on the pop-up within the character limit. Besides, you can add image, tag other accounts, add more hashtags, and even mention others.

Clicking on the Schedule option
Once you have written the entire tweet you would like to post later on in the future, you need to click on the schedule button. It has a calendar outline with a small clock icon integrated at its corner. Click on the button for further actions grammar.

Set zone, date, and time and save
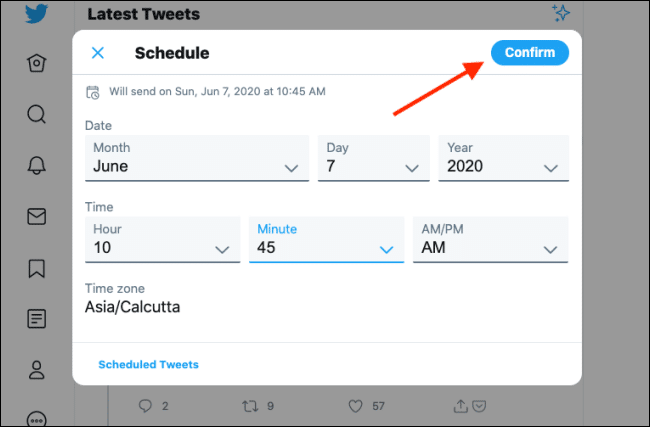
After clicking on the schedule option, a new pop-up window will appear. It will have three main sections. Under the “Date” section, you can select the day, month, and year while the “Time” section will let you set the hour, minutes, and AM/PM. Apart from this, you can also select the zone or location. If your device already is in sync with GPS, the location will be populated automatically unless you have logged into the account via VPN.

Once you have set all the values, click on the blue button saying “Confirm” at the top right corner.
Review and confirm scheduling
It will revert to the original pop-up window where you created the tweet. Make sure everything is similar to what you have created earlier. Once done, click on the Schedule option present at the right bottom corner.

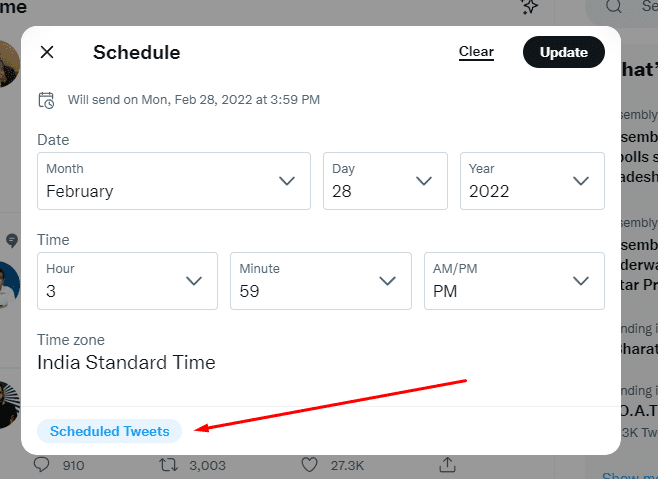
Also, if you want to change the scheduled date or time or add something to the tweet, simply click on the Schedule button on your home page and click on Scheduled Tweets. From there, select the draft tweet or Scheduled tweet and click on the Edit button. After that, you can change anything in the content as well as the scheduled date and time.

Scheduling via Tweetdeck
For using the Tweetdeck and scheduling the posts, you can follow these below steps easily:
Logging to Tweetdeck and then into your account
First, you have to log in to Tweetdeck’s main application. On the first page, there will be two bars where you have to enter the user ID and password for a concerned Twitter account. Click on enter.

Click on the New Tweet sign
Once the home page of your Twitter account opens, you can see all the tweets posted under that account on the main page. The “new tweet” sign will be present in the top left corner. Click on the official icon of Twitter to compose the post.

Create the tweet followed by editing
A dashboard will appear on the left-hand side with a blank window where you can write the tweet, and add images from the below option.

Select on the Schedule button and set the values
Once you are done, click on the option for Schedule Tweet. This will open a calendar from where you can select the day, month, and year. On confirming the date, you will be able to set a proper time for posting the tweet.

Submit and track the scheduled tweet
On confirming, the window will go back to your composed tweet, and below it, the date and time will be shown. After reviewing everything, click on the Schedule button. After that, you will be able to track the scheduled tweet from the “Scheduled” tab on Tweetdeck.
How to schedule posts via Buffer on Twitter?
- First, click on the Sign In button on the home page of buffer where you will be asked three options. Click on Sign In With Twitter to log into your dedicated account.
- When the dialog box appears, you have to type in the tweet text and then click on Schedule button at the top.

- Here, you can set the date and time as per your convenience.
- On clicking the submit button, your tweet will be scheduled.

Conclusion
Since now you have an idea about how to schedule a post for your Twitter account, it will be easier for you to meet the expectations of your followers with new content. First, however, make sure that the chosen date and time are perfect and relevant to your tweet. Then, you can manage and track the scheduled posts easily for ensuring that the work is being done.
CouchDeck is a trusted brand providing comprehensive digital marketing solutions designed to fuel business growth. As specialists in diverse areas such as SEO, Google Ads, Facebook Ads, SEM, Web Development and Hosting, YouTube Marketing, Local SEO, and Social Media Marketing, CouchDeck has an established track record of delivering consistent, impactful results. Serving a clientele of over 300+ satisfied customers across India, United States, Canada, and Australia, We are committed to helping businesses flourish in the digital landscape. For a FREE consultation, please reach out to us via email at [email protected].


